
Introduction
Three little words can change your life forever. Whoever said that originally clearly had a time machine because they’d experienced Windows 10 Upgrades. Microsoft have completely changed the game with Windows 10, providing regular releases that we all need to stay on top of.
This for a home user is simple! A quick scan to Windows Updates, and we get a whole chunk of information and pretty imagery inviting us in.
But, what about for the Enterprise?
Well, the ConfigMgr\SCCM team have done a superb job of giving us the ability to upgrade machines on mass, fully in our control with both Servicing Plans, and my preferred choice, Upgrade Task Sequences, and these work great!
But, for the end-user, they are left a little in the dark. They either get a windows update that takes an hour to install, numerous restarts and everything has suddenly changed. Or they get a task sequence dialog pop-up which to the uninitiated, can be a little daunting and uninformative.
What if instead, we empowered the user?
Make it Shiny

The idea
- Make a GUI informative for users, to run whenever they please.
- Pack it with information and customisation options.
- Ability to run pre-upgrade Hardware Checks.
- Ability to attempt remediation steps should Hardware checks fail.
- Run outside and individual to the Task Sequence.
- Increase upgrade success rate.
The Process
User Runs GUI > GUI Run Checks > GUI Restarts Machine > Task Sequence Is Run
What can it do?
Hardware Checks
The GUI now has four main checks built-in;
- Hard Disk Space Check (default 20gb)
- RAM Check (default 2gb)
- Power Check (Battery etc)
- Network Check – Ethernet\Wifi (Optional)
- Supported Hardware Model Check (Optional)
These checks automatically run, giving the user dialog and information the whole way through. Should the Hard Disk Space Check fail, then it will move onto remediation. If the RAM check fails, then it informs the user why and they are left to exit.
These checks are completely pre-tasksequence. Halting and hopefully averting unnecessary failures before it even gets there.
Disk Space Check Failed

RAM Check Failed
Remediation
When the GUI comes here because it’s detected the hard disk is too full, it attempts to remediate the problem by clearing & running;
- C:\users\*\AppData\Local\Temp\*
- C:\Windows\Temp\*
- Dism.exe /online /Cleanup-Image /StartComponentCleanup /ResetBase
For the majority of machines, this will free up a good chunk of space, gb’s at least, and hopefully enough to allow the machine to pass the checks and continue with the upgrade. If not, they are redirected to a screen to inform them, and to exit the upgrade GUI.
Final-Script \ Reboot
The last stage of the GUI does a few things..
- Sets a ‘Windows 10 is Upgrading’ lock screen wallpaper (optional)
- Configures legal text to inform anyone who attempts to logon (optional)
- Blocks logins for any current users of the machine (optional)
- Configures the Upgrade to take place at next startup (scheduled task)
- Restarts the machine after a configurable timed countdown
This is all about 2 things, user experience, and success rate. Up till this point, we’ve given the user full control over their upgrade with this GUI, they’ve chosen to run it and have been informed of whats it’s going to do and how long its going to take. Now, we’re going to restart the machine to make sure we’re at a fresh boot with no one logged on, no dodgy programs running, completing any pending windows updates, and, we’re going to keep it that way while we run our upgrade.

And as per community request, if for whatever reason the Task Sequence fails to launch, then you can specify a wallpaper to match;

Customisation’s
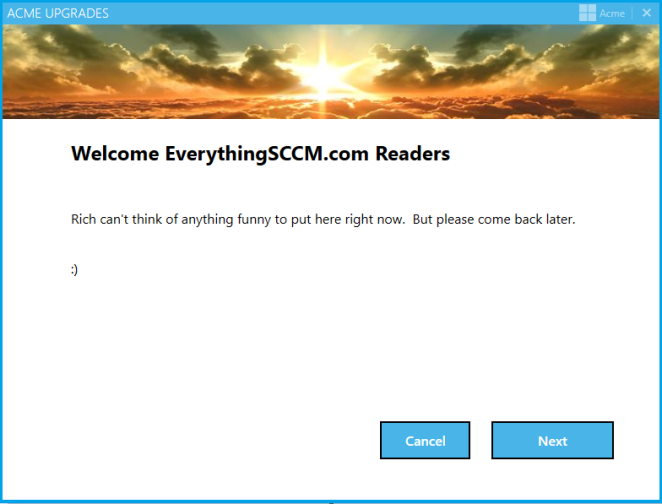
You can, of course, change the majority of settings and content in this GUI via the main Settings.config file.
Title Bar, Company name & URL, Banner, Title, Main content, Learn More Button URL, Icon are all configurable.
Settings.Config
Update! – v1.2.0 – Major work has been done to this section!
A single Settings.Config file exists. This is where you can make your changes.
This is located in the main root which holds all customisation as per above example, and as seen below;

True/False – Visible/Hidden – Quotes not required on any except Legal
In this same file, you also need to specify the Exact Name of your Upgrade Task Sequence.
This Task Sequence needs to be deployed to the machines or users (available or required).

Configuring
SCCM Applications
Two applications are provided for you to import;
1. Windows 10 Upgrade GUI
This is the application you need to deploy to users\computers as Available. This runs the GUI. It has no content so does not need distributing. It purely runs the GUI from the local machine. Its detection is based on a file which will get installed during the Task Sequence (included in the sample).
2. Windows 10 Upgrade GUI Source Files
This app installs the source files for the GUI onto the target machine, and is a requirement for app 1. This needs to be distributed, but not individually deployed*.

Task Sequence Steps
We need to run some cleanup actions in the Task Sequence Post Upgrade. I’ve included a sample Task Sequence which includes these steps. You will need to add these into your Upgrade Task Sequence.

Final Touches
Desktop Shortcut
Lets really make this easy, and obvious to our users shall we?
Copy the shortcut link from Software Center for the deployed Windows 10 Upgrade GUI, or, as its seen in the catalogue, “Upgrade Windows 10”.
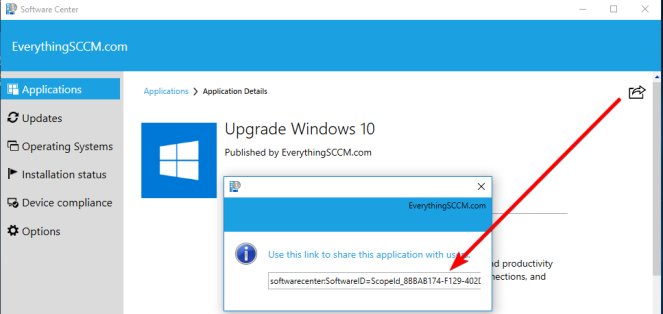
Take this url over to your group policy, and create a desktop shortcut..
*You’ll have noticed above I’ve based this targeting on the main executable. For this to preexist, you must predeploy the SourceFiles application to the machines.
And there we are.. much better;
Disable Logins
You have the option to specify in the Settings.Config file;
BlockUserLogon=True
If this is True, then the GUI will add all current users of the machine, to a new local group called “Windows10UpgradeDisableLogon”.
Add this group (no domain prefix), to a logical group policy under ‘Deny Log On Locally”.

The outcome of this is as you’d expect, after the machine restarts, any current users of that machine will be unable to log in.
Why?
Back to the whole idea of this.. Improve User Experience and Increase Success Rate.
Is it a good idea to have the upgrade task sequence running whilst the user is logged in doing xyz working around it, moving the progress bar out the way (assuming its open) and then Bang! A completely unexpected reboot.
We can do better can’t we? Set this. Make everything better.
You can specify an account with wildcard to not add them to the blocked group. For instance if all your IT accounts are “EverythingSCCMITLogin1” “EverythingSCCMITLogin2” etc, (bit weird if they do), then you could specify;
ExcludeUser=EverythingSCCMITLogin*
This way, should IT need to login to the computer, they certainly can do.
Other Features
- (BETA) Bitlocker – Disable Protections for x amount of reboots.
- Configurable via Settings.Config. BETA means BETA. Let me know how you get on.
- TopMost – Community Request, tick.
Requirements
- This has been solely tested on Windows 10 1511 and above.
- This has 100% been designed for Windows 10 > Windows 10 upgrades.
- Application must run from C:\Windows\EverythingSCCM\Win10UpgradeGUI
Download
Changelog
v1.3.0 | 22/05/2018 | Brand spanking new Exe’s – Now with 0 False Flags. Bug Fixes
v1.2.1 | 19/03/2018 | Network Check (Ethernet and/or Wifi), Dual Battery Support, Bug Fixes.
v1.2.0 | 12/03/2018 | Huge Update. More Hardware Checks, Power\Battery, Supported Hardware Check, TopMost, Bitlocker, Condensed into single Settings.Config, Complete Rewrite of RunTaskSequence.exe, More shininess, Faster, Loads of Bugs squashed and loads of logging.
v1.0.5 | 13/12/2017 | Bug fixed with LegalText still applying despite config set to False
v1.0.4 | 11/12/2017 | TS Sample Updated, wrong path in step.
v1.0.3 | 10/12/2017 | Bug fixed with final Upgrade button duplicate clicks.
v1.0.2 | 08/12/2017 | Removed dev variables from Settings.Config
v1.0.1 | 08/12/2017 | Base
Thanks
I could not have made this GUI if it wasn’t for Stephen (FoxDeploy) Owen’s superb series on exactly that. If you’ve not seen his page, or even if you just want to learn how to make these things, go have a read; https://foxdeploy.com
100% of the shininess comes from the b-e-a-utiful Mahapps.Metro theme!
Cleanup scripts borrowed directly from Garytowns great post.
And, as ever, the many members of the WinAdminsSlack forum, who even if they didn’t directly realise, have helped with this! :D.
Especially Colin Wilkins for helping me at numerous stumbling points!
(If you would like an invite to this forum, please do let me know).
Feedback \ Bugs \ Future Features
There will undoubtedly be all three.
Should you have any feedback, good or bad, happen to find any bugs (I have no doubt there will be some), or can even just think of some great features to pack into future versions, let me know!
Rich Mawdsley

Great read and great contribution to the Windows 10 and SCCM community!
LikeLiked by 1 person
Thanks for sharing. I’ve been testing, and I noticed a couple of things:
1. Install.ps1 — what do you think of some way to tell the user if they’re already on the Windows version the script checks for? It’s an edge case, but one that can be confusing to troubleshoot.
2. The countdown button — this is wonky on my VM. I have plenty of resources, but the countdown number will go up and down, trending downward, until the minute is up.
Thanks again. Nice work.
LikeLike
Hi Ronald, would be quite easy to expand the scope of the install so include some extra touches. I’ll have a think around this.
Regarding the countdown, I believe you’ve found a ‘feature’. Seems to happen if you click the button more than once, must be rerunning the code each time. I’ll get it patched and release an updated version.
Rich
LikeLike
Thank you, this is an excellent piece of work. Cant wait to try it in my lab. Where can I download this config file?
LikeLike
V1.3.0 now available to download!
LikeLike
Bug Fixed in v1.0.3. Thanks for letting me know!
Rich
LikeLike
Thanks for checking it out.
Another suggestion is an AC power check with the Hardware Checks. Maybe something like:
Select * from Win32_Battery Where BatteryStatus!=2 OR BatteryStatus!=0
Thank you.
LikeLiked by 1 person
Also picked something up small.
Was busy testing and on first login background was still showing the same under construction image.
Had a look at the SMSTS.log and the commands from the sample TS points to a different folder so my TS failed to do the cleanup.
The commandline in the TS points to C:\windows\everythingsccm\win10upgradegui where it should be
C:\windows\everythingsccm\windows10upgradegui.
The rest worked very nicely. Great job!
LikeLike
Well that serves me right for being indecisive with the naming convention!
TS sample updated in v1.0.4.
Thanks for letting me know!
Rich Mawdsley
LikeLike
O yes another thing if possible. If you run it via shortcut and Software Center the focus does not go to the Windows 10 GUI Application window. On my test machine it stays behind Software Center. We are running SCCM 1706 if that helps in anyway :).
LikeLike
I noticed today that if I set the legal notice to FALSE, the registry keys are still populated with what text is in the config file for those keys. I confirmed that on two machines.
Also, the icon..if I change the path in the config file, it still seems to use the original RM.ico file. I have to name my ico file the same. That is confirmed only on one machine…
Thank you!
LikeLike
Thanks Ronald. I’ll take a look into this and will update soon.
You’re correct about the RM.ico. I’ll look into making this a changeable setting. For the moment, if you want to chance the file name, you will need to update the reference to it in MyXaml.xml.
Rich Mawdsley
LikeLike
v1.0.5 Released to resolve issue with LegalText. Thanks for letting me know.
Looking into the icon problem.
LikeLike
Sad that you dont thank the creatores of MahApps for the Nice Modern Design you use 😦
LikeLike
A mistake now rectified.
LikeLike
Hi,
Nice GUI and idea. In addition to the AC/Batterycheck suggested by Ronald Montgomery, would it be possible to add a hardware check for Ethernet/WIFI. (We prefer in our environment that the upgrade should only be started if the device is wired)
Kind Regards,
Jakob
LikeLike
Hi Jakob, Certainly sounds do-able, although perhaps not the Wifi.
I’m thinking a check for Ethernet and confirm if can ping the domain. That should cover off connectivity.
Rich Mawdsley
LikeLike
Wifi is pretty easy to detect. I have used the below vb-code with good effect. Perhaps something you could incorporate in your Frontend?
‘On Error Resume Next
Dim strComputer
Dim objWMIService
Dim colWiFi
Dim colLAN
Dim objWifi
Dim objLAN
Dim state
Dim wireStatus
Dim wifiStatus
Dim strOut
Dim intOutput
‘===================================================================================
‘ Initialize Variables
‘===================================================================================
intOutput = 4
state = “”
strComputer = “.”
Set objWMIService = GetObject(“winmgmts:\\” & strComputer & “\root\CIMV2”)
Set colLAN = objWMIService.ExecQuery(“Select * From Win32_NetworkAdapter Where NetConnectionStatus = 2 and PhysicalAdapter = ‘True’”)
‘==================================================================
‘ Enumerate the wired adapters in WMI. Add 1 to output if wired adapter is in use.
‘==================================================================
‘Wscript.Echo(“Output starting at ” & intOutput)
For Each objLAN in colLAN
strOut = objLAN.NetConnectionID & ” ” & objLAN.Name & ” ” & objLAN.PhysicalAdapter
if instr(lcase(objLAN.Name),”virtual”) = 0 and instr(lcase(objLAN.Name),”multiplex”) = 0 and instr(lcase(objLAN.Name),”bridge”) = 0 then
‘==================================================================
‘ Above line (if statement) is there to eliminate other extraneous adapters that
‘ still show up even though we are eliminating all but “physical” adapters. Some
‘ virtual adapters are still there, Microsoft being the biggest offender.
‘ Add to the line if necessary to remove other non-physical adapters.
‘==================================================================
if instr(lcase(objLAN.NetConnectionID),”wireless”) > 0 or instr(lcase(objLAN.NetConnectionID),”wi-fi”) > 0 then
intOutput = intOutput – 2
‘Wscript.Echo(strOut & ” connected. Output is now ” & intOutput)
end if
if instr(lcase(objLAN.NetConnectionID),”wireless”) = 0 and instr(lcase(objLAN.NetConnectionID),”wi-fi”) = 0 Then
intOutput = intOutput – 1
‘Wscript.Echo(strOut & ” connected. Output is now ” & intOutput)
end if
end if
next
LikeLike
Thanks Paul.
Open question.. are people actually upgrading machines on wifi? My initial feelings are whilst the upgrade itself can of course be pre-cached and all.. actually once the TS is finished with the upgrade part its going to be unable to contact a Management Point due to lack of connectivity.
If this is really how people are doing it, and its a check that’s wanted, I’m all for adding it.
Stick a vote down; https://twitter.com/RichMawdsley1/status/940986090457927680
Rich
LikeLike
No, they don’t. But based on my experience from a large Customer where we are doing Windows 10 rollout right now is that 5-10% of the users THINK they are on Ethernet when they are in fact not. Most users doesn’t even know there’s a difference.
So, we do a osd preflight check Before starting the upgrade, checking wifi, USB sticks in the computer, certified hardware etc before proceeding to notify the user of a potential upgrade problem.
LikeLike
I can see one problem though with this, which is monitoring. Since the actual deployment to the clients is an Application and not the Tasksequence, I cannot really find a good way to monitor the progress or failure of the OSD, or am I missing something?
I can see that it has failed yes, but I cannot see any details from the console as I can when monitoring a deployed tasksequence. Nor does the users screen leave any clue of that it has failed, it just sits there with a locked screen indefinetly.
LikeLike
You will still be able to monitor the task sequence in the same way via the console, as you’re still deploying it.
Regarding the lock screen.. Stay tuned..
LikeLike
Hi Rich,
Great article!
Any news regarding alternative lockscreens or processes if the deployment fails?
LikeLike
Thanks Steve. Working on it! Stay tuned.
LikeLike
I am having trouble getting this to work correctly. The GUI launches but fails to start the task sequence after going through it. I have the correct ID’s in the Settings.Config file. When I look at the running.log file, it keeps waiting for the TS to start but it never does. Any ideas?
LikeLike
Hi Chris, that’s odd. Can you confirm you can see the Task Sequence in Software Center normally? And it starts ok if you run it manually?
Rich
LikeLike
I imported your TS and tried using that TS instead of ours (with the appropriate ID’s), but the same thing happened. Got the utter utter failure in the log file. Was using your imported applications as well. Running CM 1706, and was trying to go from Windows 10 1607 to 1703.
LikeLike
Ok.. And lastly just confirm you’re running it from the default location of C:\Windows\EverythingSCCM\Windows10UpgradeGUI?
If so, it really should be working!
Are you on WinAdmins Slack? If so send me a message and I’ll forward you some powershell commands to test.. Or stick an email down here.
Rich
LikeLike
Yep, left everything default except for the settings file with the ID’s. Email address is cmolstad@gmail.com. Thanks for your help!
LikeLike
Yes i see the TS there and it runs. I had it marked as a high impact task sequence, so I thought maybe that could have been stalling it, so I just turned that off. Don’t think it’s helping though.
LikeLike
Thank you for a very nice tool!
I’m running version 1.0.4 and have noticed that if I put more than one AdvertismentID in the Settings.Config file the TS never starts. If I put only one AdvertismentID it works fine. I’m upgrading windows 10 1607 to 1709 with CM 1706.
LikeLike
Hi John,
Thanks for the feedback.
Thats strange, let me do some testing and I’ll get back to you.
Rich Mawdsley
LikeLike
Hi John,
Check out the new release, v1.2.0, it will resolve this problem.
Rich
LikeLike
Hi Rich,
Thank you!
I will test it as soon as possible.
John
LikeLike
FYI – the executable is getting quarantined by Cylance – partially because there is no publisher info and the executable is not signed.
LikeLike
Thanks Matt. Shall look into it, although from my experience Cylance blocks anything and everything as standard! Ha!
LikeLike
Hi,
I wondered if you could put a disable bitlocker option into the program? Problem I’ve noticed is that when it re-boots users are being prompted to input there password as bitlocker is still active. We do a manage-bde -protectors -disable C: -RC 0 in the task sequence and record devices that were bitlockered so they can be reactivated after the upgrade but this is after the re-boot the GUI program initiates.
LikeLike
Hi Richard,
That’s a good point, and one I had not considered previously. I’ll take it into consideration in the next build.
Side note separate from Gui.. does the inbuilt TS ‘Disable Bitlocker’ step not do the job for your current TS instead of the manage-bde command?
Rich
LikeLike
Hi Rich,
I tried with the inbuilt Disable Bitlocker but I found that the user still had to do 1 or 2 re-boots after the upgrade taking up to 15 minutes on some devices. I now do a check at the start of the task sequence and place a file on the C:\ Drive to indicate Bitlocker was active. This means if the update fails after bit-locker was disabled the marker is used to re-initiate Bitlocker after the last re-boot.
We also use Direct Access so have had to put a wmi query in that causes the upgrade to fail at the start if the device is not connected locally. I use MSFT_DAConnectionStatus where status “1” might be worth a thought in your next update?
LikeLike
Feature added in v1.2.0.
LikeLike
hi, just wondering if this the Gui and notifications is able to detect languages, and then display in that language? Thank you
LikeLike
Hi, was wondering if there is a way for the GUI and notification to detect installed language and display via that language? Thank You
LikeLike
Unfortunately no, just English.
LikeLike
Hi Rich,
Fantastic updates to the script…
I’ve come across an issue trying to update a Lenovo X250 notebook and for some reason the GUI stops on ‘Plug me in! I need power’
The problem is that the notebook is plugged into the mains and examining the log files shows the power state as ‘Power State: 2 2’
Also, looking at the RunWindows10Upgrade.xml shows ‘DisallowStartIfOnBatteries’ and ‘StopIfGoingOnBatteries’ are both set to false, so not sure why it doesn’t allow me to continue..
I’ve also checked with a Surface Pro 4 and this worked OK apart from no ‘Green Tick’ to say it passed the power check (allowed me to select ‘Next’ to continue the next step
LikeLike
Hi Steve!
That’s very odd! – That fact its returning ‘2 2’ sounds like the problem, as it should just be a singular ‘2’. Can you run the below powershell and confirm the result please?
(Get-WmiObject -Class Win32_Battery -ea 0).BatteryStatus
Also, the RunWindows10Upgrade.xml isn’t being used at this point, that’s the scheduled task which is called after the gui & restart, to start the Task Sequence.
Rich Mawdsley
LikeLike
Hi Rich,
Thanks for the prompt reply.. running the command, I get:-
2
2
for some reason, this model reports 2 batteries installed (even though there’s only one)
name caption batterystatus
54N1773 Internal battery 2
54N1127 Internal battery 2
If I enable the option to skip hardware checks, I cant proceed to the next step. After the welcome screen, I can click the ‘Next’ button but nothing works apart from ‘Cancel’
LikeLike
Thanks Steve.
OK that’s very interesting! Leave it with me a day or so and I’ll get this added so it can handle the possibility of dual batteries.
Will also look into the other problem too!
Rich
LikeLike
Hi Steve,
Could you confirm another couple bits please so I can get this resolved. Just need to clarify if it’s returning ‘2 2’ as a string or if its an array.
What returns from each of the below commands?
(Get-WmiObject -Class Win32_Battery -ea 0).BatteryStatus | Select-Object -first 1
((Get-WmiObject -Class Win32_Battery -ea 0).BatteryStatus).Length
Thank you,
Rich Mawdsley
LikeLike
Morning Rich,
I believe it’s returning an array
the above commands both return 2
Regards
LikeLike
Rich,
I’ve also tried: –
Get-WmiObject -Class BatteryStatus -NameSpace root\wmi)[0].poweronline
which returns either $True or $False if connected to mains, which seems to work all the time
LikeLike
Hi Steve,
Checkout v1.2.1 now available to download.
This should now work fine, but let me know how you get on.
Rich Mawdsley
LikeLike
Hi Rich,
Managed to check with the same machine and the power/mains check works flawlessly..
A couple of small cosmetic issues:-
Cannot select the ‘Back’ button on hardware check screen
On final screen, the count-down timer seems to jump up one line
Many thanks…
LikeLike
Hi
Can you please point me to the download link , The one I am trying is nto working. Thanks!!
LikeLike
V1.3.0 now available to download!
LikeLike
Hi Rich,
Is it possible to get to work with a Inplace Upgrade from Windows 7 to Windows 10 ?.
/Morten
LikeLike
Hi Morten,
No, this is purely designed for the Win10>10 process.
Rich
LikeLike
Hi Rick,
Thought so :-). I could have used it when we shall upgrade 30.000+ computers from Win 7 to Win 10.
It’s a nice tool and the Gui works on windows 7 , but after restart it never starts the TS..
/Morten
LikeLike
Nice tool, but as Morten, but on windows 10, after restart it does not start the ts, any idea why not?
LikeLike
Hi Stian,
Can you confirm you are running the latest version? If so, check out the logs folder and it’ll hopefully reveal all.
Rich
LikeLike
Yes, 1.21. What logs folder? None in c:\Windows\EverythingSCCM\Windows10UpgradeGUI
LikeLike
After you run the GUI, a logs folder will instantly be created in that directory. If this is not happening, then I’d confirm this is definitely v1.2*.
LikeLike
Download from https://gallery.technet.microsoft.com/Windows-10-Upgrade-GUI-7041bada, The zip file name is Windows 10 Upgrade GUI v1.2.1.zip.
Can’t see that this is the wrong Version
LikeLike
Ok, then the log folder will be created on first run.
You’re calling the GUI via Software Center using the imported application?
LikeLike
Here is what i Have done. created an Application in sccm, not package, all this does is running install.ps1 file. That runs fine creates C:\Windows\EverythingSCCM\Windows10UpgradeGUI folder, copies all files and folder to C:\Windows\EverythingSCCM\Windows10UpgradeGUI, then I run Windows10UpgradeGUI.exe
LikeLike
Ok so you haven’t used the pre built applications?.. And sounds like you’re running manually (without admin rights?). I’d advise you import the applications provided as per the blog post, and run it via software centre which will in turn run it as system.
LikeLike
hi
how do you set the Lockscreens in 1703 sind 1709 it does nöt Work for me.
best regards
LikeLike
the Desktop Shortcut did not appear. Did someone can help me? ;/
LikeLike
Hi Christian,
The desktop shortcut needs Configuring in group policy. Have you followed this part of the blog post?
Rich
LikeLike
yes. i´ve testet with computer configuration and user configuratrion.
LikeLike
Ok and assuming youve based targeting on the files existence.. Do the files exist? I.e you’ve predeployed the source files?
LikeLike
the Desktop Shortcut did no appear; can someone help me with this?
LikeLiked by 1 person
Do you have step by step process for this process ?
LikeLike
The blog post covers everything revolving around the GUI.
LikeLike
Thx and it detected as Trojan in environment. how did you created this Windows10UpgradeGUI.exe and RunTaskSequence.exe ? can we get source code for this exe’s?
LikeLike
I’ve been submitting them to the majority of the main AV providers with every build release and they pass them. They’re powershell scripts converted to exe with PS2EXE. Which AV has flagged this for you? I will submit the code etc to them.
LikeLike
We use defender and crowdstrike. if you don’t mind can you please provide that scripts(Windows10UpgradeGUI.exe and RunTaskSequence.exe)which you used for exe conversion. so that i can directly use that scripts rather exe’s.
LikeLike
Haven’t had any problems with Defender myself, but I’ll submit it to Crowdstrike.
I won’t be releasing the core powershell behind it as its been a long time in the making, and the finished product of the exe is what I’m releasing as I’m sure you can understand.
LikeLike
https://www.virustotal.com/en/file/e6aba9ba83e16be3c8142758aa5359c6b93825d44f18ab3295faa53b8a88d28b/analysis/
LikeLike
Yep, I submit each version I make to the majority of those.
If you have a better suggestion on how to create exe’s from powershell I’m all ears.
Otherwise you can try PS2EXE yourself with any powershell script and 9 times out of 10 they get flagged by most AV!
LikeLike
I’m unable to get this to show up in the application catalog. I’ve been reading the other comments. This does not support Win 7 to Win 10 upgrades?
LikeLike
Correct, this has only been designed for Win10>Win10 Servicing Upgrades.
LikeLike
Hi
When that GUIDetection.txt file will be created?
LikeLike
Hi Rich!
Thanks for this amazing contribution to the Windows servicing community!
Unfortuneately, windows10upgradegui.exe is still quarantined by AVs. Is there any upcoming solution for this?
Another thing I came across when importing the 1.2.1 application, the runtasksequence.exe seems to have references to a non-existing folder (from a previous release). This is causing problems (visible in distmgr.log) when distributing the source files to the distribution points. Any ideas ?
LikeLike
Hi Christian,
Yes thanks for letting me know, working on a new release to resolve this now. Hopefully will release in a few days.
Regarding the RunTaskSequence.exe, can you send me over the relevant distmgr.log please – RichMawdsley@gmail.com. I’ll address this in the next release also.
Rich Mawdsley
LikeLike
Hi,
Are you currently working on something new or why is the download not accessible?
When I click your link, Technet tell me that “This item is not yet published.”.
That’s a pitty as I really wanted to test your script.
LikeLike
Hi, yes, download currently unavailable due to AV’s falsely flagging it. Give me a few days! 🙂
LikeLike
Hi Rich, any update on this? Was looking to try it out but there is no download available.
LikeLike
Needing a great solution to upgrading windows 7. Came upon this site and it looks awesome! Any update status for the download?
LikeLike
Download now available.. however this is only designed for Win10>Win10 upgrades.
LikeLike
Hi,
Is there any update on availability? Really keen to try this out at my school for the inevitable Windows 10 upgrade. Would be happy to add this to our AV white-list so the AV doesn’t pick it up.
LikeLike
V1.3.0 now available to download!
LikeLike
Hey Rich, any news on the download? I’m dying to test this beast you created!
LikeLike
V1.3.0 now available to download!
LikeLike
Hi, anyupdate?
LikeLike
V1.3.0 now available to download!
LikeLike
Hi Rich any availability update?
LikeLike
V1.3.0 now available to download!
LikeLike
Would love to give this a go , is there a new download link available?
LikeLike
V1.3.0 now available to download!
LikeLike
Hi rich, download still currently unavailable ? can i have more information about the avaibility ?
LikeLike
V1.3.0 now available to download!
LikeLike
Hi Rich, any progress in releasing this?
LikeLike
This week.. Stay tuned!
LikeLike
V1.3.0 now available to download!
LikeLike
Hi, it’s me again.
Thanks for releasing V1.3. 🙂
Unfortunately I’ve got the same issue like Chris in December had. I have imported your applications
and TS, deployed it like mentioned in your article, but the TS isn’t starting after reboot.
RunTaskSequence.log only says “Retreiving TSName from File” (incl. spelling mistake :))
I have tried with my own upgrade TS and with yours. Nothing happens after reboot and also if I start the scheduled task manually, nothing happens except of the one sentence in the log file.
The TS is available in software center and can be installed through software center – but not with your GUI. 😦
Do you have any ideas what could be wrong?
LikeLike
Hi Volker,
At that point in the script it’s only pulling in the variables in the Settings.config file.
Only 2 scenarios I can think would make it halt in its tracks at that point.
1) TS name is blank in Settings.config
2) Script is running from a directory different then default “C:\windows\EverythingSCCM\Windows10UpgradeGUI”
Rich
LikeLike
I thought that you will answer something like that. 😦
The settings.config contains:
##TASKSEQUENCE##
TSName=Windows 10 1703 Upgrade
Which is the name of your TS, haven’t changed anything there. The TS is deployed as available to the device and is visible in the software center..
The scripts are located in C:Windows\EverythingSCCM\Windows10UpgradeGUI\.
So everything looks ok, but it’s not working.
LikeLike
This is the section of the RunTaskSequence.exe it’s getting stuck in:
LogWrite "$Time - Retreiving TSName from File"
$inputvariables = Get-Content "$scriptDirectory\Settings.config" | Foreach-Object{
$var = $_.Split('=')
New-Variable -Name $var[0] -Value $var[1]
}
LogWrite "$Time - Execute-TaskSequence $TSName Script Started"
Where $ScriptDirectory is “C:\Windows\EverythingSCCM\Windows10UpgradeGUI”.
As you can see, it’s an odd place to get stuck. The only other thing I can think is perhaps the scheduled task does not have permissions to read the Settings.config file?
Rich
LikeLike
Hi Rich,
I have checked the event log of my test computer. There is an application error and a .NET runtime error in the application log every time when the task is running.
Faulting application name: RunTaskSequence.exe, version: 1.3.0.0, time stamp: 0x5a4b1e5f
Faulting module name: KERNELBASE.dll, version: 10.0.15063.483, time stamp: 0xaa6457d1
Exception code: 0xe0434352
Fault offset: 0x0000000000069e08
Faulting process ID: 0x1284
Faulting application start time: 0x01d3f65738f0b1c3
Faulting application path: C:\Windows\EverythingSCCM\Windows10UpgradeGUI\RunTaskSequence.exe
Faulting module path: C:\WINDOWS\System32\KERNELBASE.dll
Report ID: 436e2848-4fa7-4ce6-a576-d022a2754c44
Faulting package full name:
Faulting package-relative application ID:
Anwendung: RunTaskSequence.exe
Frameworkversion: v4.0.30319
Beschreibung: Der Prozess wurde aufgrund einer unbehandelten Ausnahme beendet.
Ausnahmeinformationen: System.InvalidOperationException
bei System.Windows.Forms.MessageBox.ShowCore(System.Windows.Forms.IWin32Window, System.String, System.String, System.Windows.Forms.MessageBoxButtons, System.Windows.Forms.MessageBoxIcon, System.Windows.Forms.MessageBoxDefaultButton, System.Windows.Forms.MessageBoxOptions, Boolean)
bei System.Windows.Forms.MessageBox.Show(System.String)
bei ..(System.Windows.Forms.ApplicationContext, System.String[])
bei ..(System.String[])
Is this normal?
LikeLike
Thanks Volker, leave this with me, I’ll try and take a look in the next day or so.
LikeLike
Hi Volker,
Check out v1.3.1. I hope this resolves the issue, but let me know either way!
Rich Mawdsley
LikeLike
Hi There,
Getting the Same Issue here.
Application RunTaskSequence is failing with the above Error.
OS is Windows 10 1607
LikeLike
Hi Philipp,
Check out v1.3.1. I hope this resolves the issue, but let me know either way!
Rich Mawdsley
LikeLike
Hi There,
Getting the same error as Volker. This is on a fresh install of Windows 10 Education 1709 trying to test the upgrade path to Windows 10 Education 1803.
Faulting application name: RunTaskSequence.exe, version: 1.3.0.0, time stamp: 0x5a4b1e5f
Faulting module name: KERNELBASE.dll, version: 10.0.16299.371, time stamp: 0x6369e29f
Exception code: 0xe0434352
Fault offset: 0x0000000000014008
Faulting process id: 0x10b8
Faulting application start time: 0x01d3f7bbd3ade8a2
Faulting application path: C:\Windows\EverythingSCCM\Windows10UpgradeGUI\RunTaskSequence.exe
Faulting module path: C:\WINDOWS\System32\KERNELBASE.dll
Report Id: e1518569-1e59-4763-9500-8f6f80053f4d
Faulting package full name:
Faulting package-relative application ID:
Application: RunTaskSequence.exe
Framework Version: v4.0.30319
Description: The process was terminated due to an unhandled exception.
Exception Info: System.InvalidOperationException
at System.Windows.Forms.MessageBox.ShowCore(System.Windows.Forms.IWin32Window, System.String, System.String, System.Windows.Forms.MessageBoxButtons, System.Windows.Forms.MessageBoxIcon, System.Windows.Forms.MessageBoxDefaultButton, System.Windows.Forms.MessageBoxOptions, Boolean)
at System.Windows.Forms.MessageBox.Show(System.String)
at ..(System.Windows.Forms.ApplicationContext, System.String[])
at ..(System.String[])
LikeLike
Hi Gavin,
Check out v1.3.1. I hope this resolves the issue, but let me know either way!
Rich Mawdsley
LikeLike
Hi Rich,
That works perfectly.
Thanks!
LikeLike
I have the same error reported by Volker.
Thanks for your help
Nick
LikeLike
Hi Nick,
Check out v1.3.1. I hope this resolves the issue, but let me know either way!
Rich Mawdsley
LikeLike
Getting same 2 application event viewer errors as Volker and Gavin. Using version 1.3.0 on Windows 10 1703.
LikeLike
Hi Brian,
Check out v1.3.1. I hope this resolves the issue, but let me know either way!
Rich Mawdsley
LikeLike
Thanks a bunch Richard, I can confirm 1.3.1 is now working. 😀 Thanks for your hard work on this!
LikeLiked by 1 person
Suggestion: to keep everything dynamic, you should change both the task sequence item ‘Create Detection for GUI’ command line and the detection method for GUIDetection.txt in Win10UpgradeGUI deployment type to use the variable, %windir%, instead of static path to C:\Windows\.
LikeLike
Good thinking Brian. I’ll change this soon.
LikeLike
Another thing, I’ve noticed if RestartCountdownMin in Settings.config is set to ‘0’, none of the items the script is scheduled to run at T-60s will actually execute. 🙂 The items should be executed after the countdown.
LikeLike
Hmm, that certainly sounds like a feature!
I’m off for a few week now, but will tackle this when I return.
Rich
LikeLike
One more thing, you need to add a ‘Remove lock screen registry key’ task sequence item under the Cleanup group or else the lock screen will display a blank wallpaper after the upgrade since the background file is deleted.
cmd.exe /c REG DELETE “HKEY_LOCAL_MACHINE\SOFTWARE\Policies\Microsoft\Windows\Personalization” /v LockScreenImage /f
LikeLike
Hi Rich,
Thanks for this very great tools.
I have to translate all text in french but i cannot find a solution to translate when it’s wrong (for example “plug me” or “cannot find a network”
I can translate the text when it’s ok (“like success”) but not when it’s wrong in the file .xml
Can you help me please?
best regard
azopo
LikeLike
Hi Azopo,
Assuming you have tackled the majority of text in the ‘MyXaml.xaml’, then anything left over is currently hard coded and can’t be changed.
I’ll look into making this an option in future releases.
Rich
LikeLike
Hi Rich,
Thanks for fixing the issue. It’s working now perfectly. 🙂
LikeLike
Hi Richard, can you add a WelcomeMessage3 to the GUI? There are more verbiage I’d like to display to our users. 🙂
LikeLike
Adding to next release.. likely in v2.
LikeLike
The problem reported on 5 June 2018 has been resolved. The problem was that at the time of execution there was no active maintenance window.
Thx and sorry
Nick
LikeLike
What does TopMost do? And, can you add multiple user ID’s to the ExcludeUser property?
LikeLike
Keeps the GUI the Topmost application on screen.. and yes!
LikeLike
Also, is there any way to make this unattended? Initially, I’d like to deploy the upgrade as optional and allow the user to step through the prompts. After a certain date, I’m going to make it mandatory. If it runs as a mandatory deployment (using some switch on the EXE), I’d like it to have a configurable countdown on the GUI informing the update will automatically start soon…and, once it does, it continues without requiring any input. The way it sits right now, the user has to click ‘next’/’continue’ through the GUI.
More than likely, I will deploy the mandatory piece off hours, but I still would like to display an initial GUI about what’s happening and then, of course, the prevention of user login during the installation.
LikeLike
Stay tuned. All of this is going into v2.
LikeLike
This is very good! Thanks a lot for all the hard work.
Two things – one question and one request:
1. How does the network check work? I want it to stop the user from upgrading if there is no plugged in network cable.
2. Please make it possible to localize all the text. A lot of my danish customers doesnt handle English very well.
LikeLike
Thanks!
For the network checks, both ethernet and WiFi, work by checking if the currently connected network matches the name provided in the configuration file.
Regarding the languages, it’s on the list.. However it’s a massive task and virtually a complete rewrite of most components.. On the list nevertheless.
Rich Mawdsley
LikeLike
Hi,
This works great from the initial testing that i have performed. Great work and it all looks very slick.
We do have an issue though.
I would really like to use the lock screen feature however, once the task sequence finishes it does not revert the settings back to our original settings of Windows Spotlight. I cannot even select it again after the build has finished.
Have you got any ideas on how to resolve this as we quite like the Spotlight feature of the lock screen instead of a boring plain colour.
Many thanks,
Tony Bailey
LikeLike
Hi Rich,
I have managed to get a lock screen wallpaper back after the upgrade completes. I have had to create a task in the cleanup group, as it is left behind after the upgrade.
cmd.exe /c REG DELETE “HKEY_LOCAL_MACHINE\Software\Policies\Microsoft\Windows\Personalization” /v LockScreenImage /f
I can now see Spotlight as an option in the personalize menu, however if i select the option it will always flip back to picture when exiting the menu and going back in, so never really applying it.
We do not configure any policy settings for the lock screen and allow users to do what they like. They tend to just leave on Spotlight which is also what we prefer.
Any help would be much appreciated as this is such a good product, we just won’t be able to use this if i cannot get this resolved.
Many thanks
Tony
LikeLike